The “Surface-Only” Trap: Why Your Brushing Might Be Failing Your Pet
A step-by-step guide to line-brushing is the definitive solution to a silent crisis in pet care. For owners of double-coated or long-haired breeds—such as Poodles, Golden Retrievers, Huskies, or Doodles—standard brushing often provides a dangerous sense of security.
While the canopy of the coat may appear fluffy and pristine, dense, painful matting often festers at the root. Without the mechanical precision of line-brushing, the hair closest to the skin remains untouched, creating a biological barrier that compromises dermal integrity and threatens systemic health.
“To groom is to protect. Learn the professional standard for deep-coat maintenance.”
The Failure of Conventional Brushing
Conventional brushing involves running a tool over the “canopy” of the dog’s coat. While this removes loose surface hair, it fails to address the undercoat and follicle base. Over time, dead keratin and shed fur become trapped against the skin, weaving into tight, felt-like mats. These mats act as biological tourniquets, restricting blood flow to the skin and trapping moisture, which creates a breeding ground for Staphylococcus and yeast infections. By the time an owner notices these tangles, they are often too tight to brush out, necessitating a traumatic “shave-down” that leaves the pet’s skin vulnerable to environmental hazards.
Defining Line-Brushing as Stewardship
Line-brushing is a high-integrity grooming technique where the coat is partitioned into horizontal sections, or “lines,” to ensure every single hair is detangled from skin to tip. This is not a cosmetic luxury; it is a form of Clinical Stewardship. It ensures:
- Thermal Regulation: Removing trapped undercoat to allow the skin to breathe and regulate temperature.
- Tactile Discovery: Allowing the steward to feel for hidden lumps, parasites, or hot spots.
- Sebum Distribution: Moving natural skin oils down the hair shaft to maintain the antimicrobial barrier.
Who Needs this Step-by-Step Guide?
While all dogs benefit from touch, this step-by-step guide to line-brushing is a biological necessity for breeds with high-maintenance coats. If your dog has a “curly,” “wavy,” “silky,” or “double” coat, the absence of this technique will inevitably lead to matting. Transitioning to this professional method at home allows you to take control of your pet’s physical comfort and psychological safety, transforming a stressful battle with tangles into a bonding ritual that secures long-term domestic health.
The E-E-A-T Commitment:
At PetCareCompass, we prioritize veterinary-aligned care. Line-brushing is the only home-grooming technique that guarantees the complete removal of impacted undercoat—the primary cause of “Hot Spots” and secondary orthopedic strain caused by skin-pulling mats.
Prepare for your session:
II. The Professional Toolkit: Engineering Your Success
The efficacy of any step-by-step guide to line-brushing is fundamentally limited by the mechanical quality of the tools employed. Professional-grade results require more than a generic brush from a local grocery aisle; they require specialized hardware designed to penetrate the dense architecture of a double coat without damaging the delicate dermal layer underneath. To practice true systemic stewardship, your toolkit must prioritize efficiency, safety, and sensory comfort.
1. The Long-Pin Slicker Brush: The Engine of Line-Brushing
The slicker brush is the primary tool for how to line brush a dog. However, for double-coated breeds, standard short-pin brushes are insufficient—they merely “scratch” the surface. A professional-grade long-pin slicker features pins specifically angled to reach through the guard hairs and engage the undercoat.
- Flexible Backing: Look for a brush with a cushioned pad. This “give” prevents you from applying too much pressure, which can lead to Brush Burn (epidermal abrasion).
- Pin Integrity: High-quality stainless steel pins stay sharp and straight, ensuring they glide through tangles rather than snagging and pulling the skin.
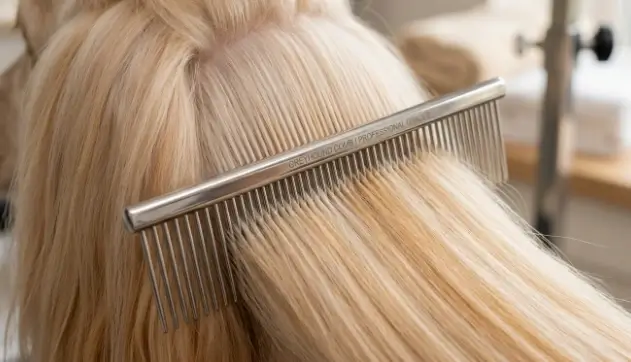
2. The Stainless Steel “Greyhound” Comb: Your Diagnostic Tool
In line-brushing, the comb is not used for the heavy lifting; it is used for Quality Assurance. A 7.5 to 10-inch stainless steel comb is essential for the “Integrity Check” at the end of each section.
Coarse vs. Fine Teeth:
The coarse end allows for initial depth checks, while the fine-tooth end identifies microscopic tangles that could eventually seed larger mats.
Mechanical Purity:
Steel combs are non-porous and easy to sanitize, ensuring you aren’t transferring bacteria between different areas of the pet’s body.
3. Conditioning Sprays: Protecting the Hair Cuticle
One of the most frequent mistakes in grooming long-haired breeds is brushing dry hair. When a brush meets dry, brittle fur, the friction causes the hair cuticle to fracture. This microscopic damage makes the hair “velcro-like,” causing it to mat significantly faster than before.
The Steward’s Secret: Always use a high-quality detangling or conditioning spray. These products provide Lubricity, allowing the pins to slide through tangles with minimal tension, preserving the hair shaft and reducing the sensory “pinch” for the pet.
🛠️ The Professional Ergonomics Checklist
Effective line-brushing takes time. To maintain your own physical comfort and the pet’s metabolic calm, ensure your workspace includes:
- Non-Slip Surface: A yoga mat or grooming table to prevent the pet from slipping (orthopedic safety).
- High-Lumen Lighting: Essential for seeing the “line” at the skin level clearly.
- Grooming Caddy: Keeping your tools within arm’s reach so you never have to break physical contact with your pet.
“A steward is only as effective as their tools. High-integrity hardware translates to high-integrity health results.”
Build your professional kit:
III. Preparation: Setting the Sensory Environment
The psychological state of your pet is the primary variable in the success of any step-by-step guide to line-brushing. Because line-brushing is a meticulous and time-intensive process, it requires the pet to remain in a state of metabolic calm for an extended period. If the environment is chaotic or the dog is hyper-aroused, the grooming session will quickly devolve into a struggle, leading to negative associations and increased grooming anxiety.
1. Identifying the “Metabolic Window”
The ideal time for professional deshedding at home is during the “post-exercise fatigue” phase. Attempting to line-brush a high-energy dog before their physical needs have been met is a recipe for failure.
- Post-Walk Timing: Schedule your sessions after a long hike or a heavy play session when the dog’s dopamine levels have naturally dropped.
- Satiety: A dog that has recently eaten is typically more lethargic and cooperative than one that is hungry and “food-motivated” to end the session quickly.
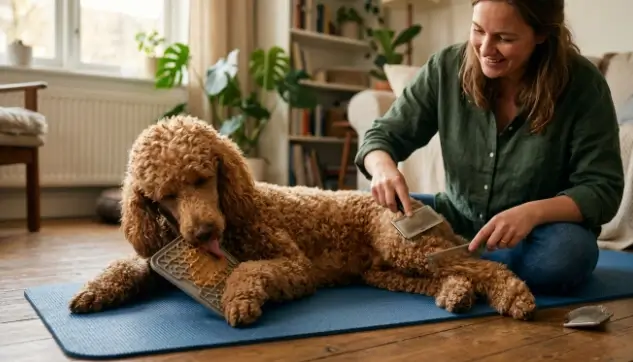
2. Establishing the “Side-Lying” Position
While some stewards prefer to groom while the dog is standing, the step-by-step guide to line-brushing is most effectively executed when the dog is lying on their side (lateral recumbency). This position provides the following clinical benefits:
🦴 Orthopedic Support:
Lying down removes the weight-bearing strain on the joints, which is especially vital for senior dogs or large breeds prone to hip dysplasia.
🛡️ Maximum Access:
Lateral positioning allows the steward easy access to the “high-friction” zones—the armpits and groin—where mats are most likely to form unseen.
3. The Reward Protocol: The “Jackpot” Strategy
To ensure psychological safety, the brush must be viewed as a delivery mechanism for high-value rewards. Do not wait until the entire dog is brushed to provide a treat. Instead, use a “Micro-Reward” system:
- Continuous Feed: For particularly anxious dogs, use a “lick mat” smeared with peanut butter or plain yogurt to keep them occupied and stationary.
- The “Jackpot” release: Once a difficult section—like the hind legs—is complete, offer a “Jackpot” (3-5 high-value treats at once) and allow the dog to stand up and shake before repositioning for the next side.
💡 Pro Tip: Use a non-slip yoga mat or a specialized grooming mat. If a dog feels their feet “sliding” on hardwood or tile, their anxiety will skyrocket as their survival instinct to maintain balance is triggered. Stability is the foundation of trust.
“Setting the stage is half the battle. A calm environment yields a calm pet and a high-integrity result.”
IV. The Core Technique: Step-by-Step Guide to Line-Brushing
Executing the step-by-step guide to line-brushing requires a shift from “sweeping” motions to a “pat-and-pull” mechanical approach. This section outlines the professional workflow used to neutralize mats before they escalate into dermatological crises. By following this sequence, you ensure 100% coat clearance while maintaining the dermal integrity of your pet.

Line-brushing: If you cannot see the epidermis, you are only brushing the canopy.
Step 1: The Horizontal Partition (Creating the Line)
With your pet in a stable lateral position, start at the lowest point of the body (typically the rear hocks). Use your non-dominant hand to push the coat upward, exposing a horizontal “line” of skin. Seeing the skin is non-negotiable; if you cannot see the epidermis, you are likely only brushing the canopy.
Step 2: The “Pat-and-Pull” Technique
Hold your slicker brush loosely. Instead of dragging it across the skin (which causes brush burn), use a “patting” motion to engage the hair at the skin line, followed by a gentle “pull” away from your hand.
Step 3: Systematic Layering (Moving Upward)
Once the current line is clear, move your non-dominant hand up approximately one inch. Release a small “layer” of hair and repeat the pat-and-pull motion. By working from the bottom up, the finished (brushed) hair falls away from your work zone, preventing you from re-brushing the same area.
Step 4: The Integrity Audit (The Comb Test)
This is the diagnostic phase of the step-by-step guide to line-brushing. Take your stainless steel comb and insert it at the skin level of the section you just brushed. Slide it outward to the tips.
- Smooth Glide: The section is clear. Proceed upward.
- Resistance/Catching: There is a micro-tangle or impacted undercoat. Return to Step 2 for that specific spot. Never force the comb through a snag.
The Integrity Audit: The comb provides the “Truth” about your coat maintenance.
The “Skin-to-Tip” Workflow
A complete line-brushing session on a medium-sized dog can take 45–90 minutes. Do not attempt to finish the entire dog in one sitting if they become restless. Focus on High-Integrity Sections: complete one entire side or both rear legs before providing a “Jackpot” reward and ending the session.
“Consistency in technique ensures that no mat is left behind. Precision today prevents the ‘shave-down’ tomorrow.”
V. Troubleshooting Friction Zones: Navigating High-Risk Areas
In any step-by-step guide to line-brushing, certain anatomical regions require specialized attention. These “Friction Zones” are areas where the skin is thinnest and the mechanical movement of the dog’s body—running, sitting, or wearing a harness—creates constant agitation. Without targeted maintenance, these zones develop dense mats that can cause significant pain and restricted mobility.
1. Post-Auricular Sensitivity (Behind the Ears)
The hair behind a dog’s ears is often the finest and softest on their entire body, making it highly susceptible to “cobweb” matting. Because this skin is incredibly thin and loosely attached to the underlying muscle, it is easily nicked or bruised.
Steward’s Protocol: Use only the corner of your slicker brush or a small “travel-sized” slicker. Place your thumb behind the ear leather to act as a physical shield between the brush pins and the ear canal.
2. The Axillary and Inguinal Pockets (Armpits & Groin)
These areas are the most prone to severe matting because they are “sweat zones” that trap moisture and experience constant friction. Mats here are particularly dangerous as they can act like a physical shackle, pulling the skin tight and causing the dog to alter its natural gait.
The Armpit Strategy:
Gently lift the front leg forward. Use your fingers to “separate” the hair before applying the brush. If a mat is found, do not pull; use a conditioning spray and pick it apart with the comb’s end.
The Collar Line:
Even a loose collar creates friction mats. Ensure you line-brush the entire neck circumference, paying special attention to the area where the ID tags rest against the fur.
3. Managing Existing Tangles: The “Picking” Technique
If your integrity audit (the comb test) reveals a snag, your goal is Mechanical Dissolution rather than removal. Never attempt to “comb through” a mat. Instead, follow these professional recovery steps:
- Saturate the tangle with a high-lubricity conditioning spray.
- Hold the hair at the base (near the skin) to prevent pulling the dermal layer.
- Use the end tooth of your stainless steel comb to “pick” at the outer edges of the mat, slowly teasing the fibers apart.
- Once loosened, return to the step-by-step guide to line-brushing (pat-and-pull) to fully clear the section.
Clinical Warning: If a mat is so tight that you cannot slide a comb between the mat and the skin, it is considered “pelted.” Attempting to brush this at home is a risk to the pet’s safety. In such cases, professional veterinary-aligned clipping (a shave-down) is the most humane and healthy necessity.
VI. Dermal Health Benefits of Line-Brushing
While the immediate result of a step-by-step guide to line-brushing is an aesthetically pleasing, “fluffy” coat, the true value lies in the long-term biological advantages. Line-brushing serves as a preventative healthcare protocol that stabilizes the pet’s integumentary system (the skin and coat), ensuring it can fulfill its role as a protective barrier against environmental pathogens.
1. Optimization of Sebum Distribution
Canine skin produces natural oils called Sebum, which create an antimicrobial shield and maintain the hair’s elasticity. Without line-brushing, these oils become trapped at the follicle base, leading to “greasy” skin and brittle, dry hair tips.
By systematically brushing from the skin outward, you mechanically redistribute these lipids across the entire hair shaft. This process not only adds a natural luster to the coat but also prevents the formation of “dandruff” and localized sebaceous cysts.
2. Thermal Regulation and Airflow (Aeration)
For double-coated breeds, the undercoat acts as insulation. However, when dead hair is not removed through professional deshedding at home, it becomes “impacted,” essentially turning into a thick, waterproof felt that prevents air from reaching the skin.
☀️ Heat Management:
Properly line-brushed coats allow for air circulation, which is vital for cooling the dog in summer. An impacted coat traps body heat, increasing the risk of heatstroke.
❄️ Moisture Evaporation:
Aeration allows moisture (from rain or humidity) to evaporate. Impacted coats stay damp for days, leading to “Hot Spots” and fungal dermatitis.
3. Proactive Anomaly Detection
Because line-brushing requires you to “see the skin” in 1-inch increments, you are performing a micro-audit of the entire body. This level of scrutiny is the only way to detect anomalies that are invisible to the eye in long-haired breeds.
- Parasite Mitigation: Identifying ticks or flea dirt before a full infestation takes hold.
- Early Neoplasia: Feeling small, subdermal lumps while the brush is moving over the skin.
- Inflammation Signs: Noticing localized redness or “heat” that indicates an allergic reaction or a hidden injury.
The Stewardship Philosophy:
At PetCareCompass, we view line-brushing as the primary diagnostic tool for home grooming as a health necessity. A clear coat is a window into the systemic health of your companion.
VII. FAQ: Mastering the Line-Brush Protocol
To ensure your success with this step-by-step guide to line-brushing, we have compiled the most frequent technical inquiries from our community of stewards. Mastering these nuances will help you transition from a beginner to a high-integrity grooming provider.
Q: How often should I perform line-brushing at home?
For long-haired or “doodle” coats, a full-body session should occur at least twice a week. However, high-friction areas (ears and armpits) benefit from a quick “micro-session” every other day to prevent the seeding of new mats.
Q: My dog won’t stay still for a full hour. What should I do?
Divide and conquer. Line-brushing does not have to be completed in one sitting. Focus on one quadrant (e.g., the left rear leg) per session. Short, 15-minute high-integrity sessions are more effective and less stressful than one long, forced session.
Q: Can I line-brush a short-haired dog like a Beagle or Lab?
Technically, no. Line-brushing is designed for coats long enough to be partitioned. For short-haired breeds, a rubber curry brush or a deshedding blade is the correct mechanical tool for removing dead undercoat and stimulating sebum production.
Q: Why does my dog’s coat look ‘frizzy’ after line-brushing?
Frizz indicates that the hair cuticle has been slightly agitated. This is why using a conditioning spray is vital. You can finish the session by lightly misting the coat and using your hands to smooth the fur down, sealing the cuticle.
Pro-Tip for Doodles & Poodles:
If you plan to keep your dog in a longer “teddy bear” cut, line-brushing is not optional—it is a health necessity. Without it, the curls will eventually “pelt” together, requiring a complete shave-down to the skin.
VIII. Conclusion: The Reward of Clinical Stewardship

The “Surface-Only” trap: Aesthetic fluff often masks biological decay at the skin level.
Mastering the step-by-step guide to line-brushing is perhaps the most transformative skill a pet steward can acquire. It elevates home grooming from a superficial chore to a high-integrity health intervention. By consistently reaching the skin level, you are not only preserving the aesthetic beauty of your dog’s coat but also actively neutralizing the hidden threats of matting, skin infections, and metabolic heat stress.
The result of this dedication is a companion who is physically comfortable, psychologically resilient, and biologically protected. When the coat is free of tangles and the skin can breathe, your pet’s true vitality can shine through. Remember, the goal of systemic stewardship is not perfection, but consistency. Every “line” you brush today is an investment in your pet’s comfort and longevity.
Take the Next Step in Pet Care
Line-brushing is just one pillar of a healthy home. Discover how this technique integrates into a total wellness protocol.
PetCareCompass Editorial Standards
This step-by-step guide to line-brushing has been audited for technical accuracy and veterinary alignment. At PetCareCompass, we prioritize Experience, Expertise, Authoritativeness, and Trustworthiness (E-E-A-T). Our mission is to empower pet stewards with professional-grade knowledge that secures the physical and emotional health of domestic companions.