Why Dog Nail Care at Home is a Health Necessity
Many owners view nail trimming as an occasional grooming task. However, in the world of veterinary sports medicine, short nails are considered non-negotiable for joint longevity. Overgrown nails don’t just “look long”.
The Biomechanics of Overgrown Nails
When a dog’s nails are too long, they constantly strike the ground, sending “false” sensory signals to the brain. This interferes with Proprioception—the dog’s ability to sense its body’s position. To compensate, the dog shifts its center of gravity, causing:
- Hyperextension: Constant upward pressure on the toe joints.
- Secondary Joint Strain: Increased wear and tear on the hocks, stifles (knees), and hips.
- Spinal Misalignment: A “roached” or curved back as the dog attempts to take weight off its toes.
Early Warning Signs: Is it Time for a Trim?
Don’t wait for your dog to limp. By the time a dog shows pain, the nails have likely been too long for months. Use this professional checklist to evaluate your dog nail care at home needs:
🔊 The “Click” Test:
If you hear clicking on hardwood or tile, the nails are already interfering with the dog’s natural gait.
🐾 The “Floor Gap” Rule:
When standing on a flat surface, the nails should ideally not touch the floor. You should be able to slide a piece of paper under them.
The “Quick” Factor: Why Consistency Wins
Inside every nail is the Quick—a living vein and nerve. When nails are neglected, the quick grows longer, making it impossible to cut the nail to a healthy length without causing bleeding. Frequent, tiny trims in your dog nail care at home routine encourage the quick to recede, allowing for shorter, healthier nails over time.
Strategic Tip: Incorporating nail checks into your broader daily dog care routines at home reduces “grooming anxiety” by making the process a normal, non-eventful part of life.
Decoding Dog Nail Anatomy: The Secret to Safe Trimming
Before you make your first cut, you must understand what is happening inside the nail. Dog nail care at home is essentially an art of navigating the Quick—the sensitive living tissue that supplies blood and sensation to the nail.
The Quick: The Nerve Center
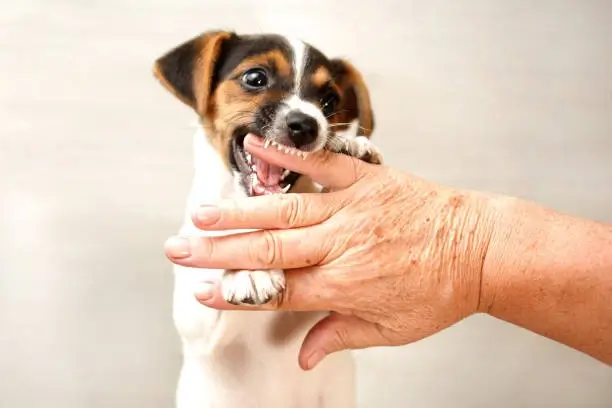
Think of the quick as the “wick” inside a candle. It contains a blood vessel and a nerve ending. If you cut into it, it will bleed and cause sharp, stinging pain—this is what creates “nail phobia” in dogs.
⚪ Light Nails:
The quick is visible as a pinkish shadow inside the translucent shell. You can safely cut up to 2-3mm before the pink area starts.
⚫ Dark Nails:
The quick is invisible from the outside. You must look at the cross-section after each small shave. When you see a dark, moist dot in the center, STOP immediately.
The “Receding Quick” Phenomenon
A common mistake in dog nail care at home is waiting too long between sessions. Biologically, the quick grows along with the nail. If you wait months, the quick will be very long, and you won’t be able to trim the nail short.
The Professional Strategy: By trimming just a tiny bit every 7–10 days, you “pressure” the quick to recede toward the paw. Over time, this allows you to maintain a much shorter, healthier nail without ever hitting the blood vessel.
Factors Influencing Growth Speed
Not all dogs grow nails at the same rate. Understanding these variables helps you customize your schedule:
- Substrate: Dogs walking on concrete “file” their nails naturally, while indoor dogs on carpet need more frequent human intervention.
- Diet & Age: Senior dogs often have thicker, more brittle nails that grow slower but are more prone to splitting.
- The Dewclaws: Never forget the “thumb” nail (dewclaw) located higher up the leg. Since it never touches the ground, it doesn’t wear down and can grow into a painful circle if ignored.
Explore more grooming guides:
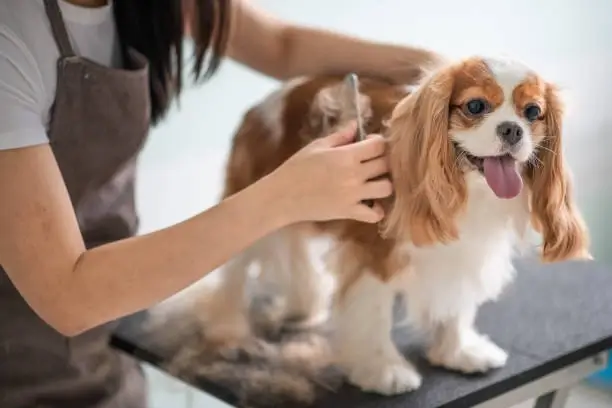
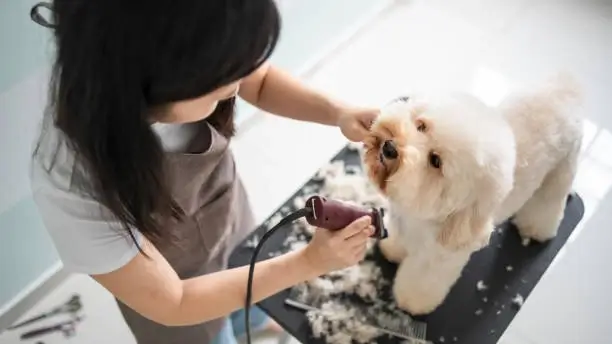
The Professional Toolkit: Choosing Your Gear
The success of dog nail care at home is often determined by the quality of your equipment. Dull blades don’t cut; they crush, causing pressure and pain even if you don’t hit the quick. Selecting the right tool for your dog’s specific nail density is your first safety measure.
| Tool Type | Best For | Expert Verdict |
|---|---|---|
| Scissor Clippers | Large breeds & thick nails | Provides the most leverage. Look for stainless steel with a “safety guard.” |
| Guillotine Clippers | Small to medium dogs | Easier to aim precisely, but blades must be replaced frequently to stay sharp. |
| Electric Grinders (Dremel) | Black nails & smooth finish | Safest for beginners. Sands the nail down slowly to prevent over-cutting. |
The “Safety First” Emergency Kit
Before you start your dog nail care at home session, have these ready. Never “wing it” without a clotting agent:
- Styptic Powder (Kwik Stop): The gold standard for stopping bleeding instantly.
- Cornstarch/Flour: A reliable pantry substitute if you’re in a pinch.
- High-Lumen Flashlight: Essential for backlighting light-colored nails to see the quick clearly.
Mastering the Preparation: Mindset over Mechanics
Step 1: The “Low-Stakes” Desensitization
If your dog hides at the sight of clippers, your dog nail care at home routine starts days before the first cut. Leave the tool on the floor near their food bowl. Touch their paws with the tool while it’s closed, then immediately give a high-value treat. Your goal is to associate the tool with reward, not restraint.
Step 2: Choosing the Right Surface
Slippery floors increase anxiety. Place your dog on a non-slip yoga mat or a groomed carpet area. For small dogs, a raised table with a towel provides better visibility and saves your back, making the dog nail care at home process more controlled for both parties.
💡 Pro Tip: Always trim nails after a walk or a meal when your dog is naturally more relaxed and sleepy. A “tired” puppy is much easier to groom than a “bouncy” one!
Engineering the Environment: Reducing Sensory Triggers
Dogs are emotional sponges; they mirror your energy and react to sensory stimuli. Before the first clip, your goal is to eliminate “environmental friction” that could escalate into a flight-or-fight response during dog nail care at home.
⏰ The Metabolic Window
Aim for “Post-Exercise Fatigue.” Trimming after a long hike or a heavy play session utilizes their natural post-activity dopamine drop to keep them still.
🧘 Alignment & Level
Avoid looming over your dog. Squatting or sitting at their eye level removes the “predatory” posture that many dogs find threatening.
💡 Lighting Precision
Shadows lead to mistakes. Use a dedicated task light or a headlamp to ensure the “Quick” is illuminated from all angles.
The Counter-Conditioning Protocol: Building Paw Trust
If your dog retracts their paw reflexively, you are dealing with a Withdrawal Reflex. To fix this, your dog nail care at home routine must temporarily ignore the nails and focus on the paw itself.
Step 1: The “5-Second Touch” Rule
Many dogs associate paw-holding with pain. Break this link by gently massaging the paw for exactly 5 seconds without any tools in sight. Reward with a high-value treat (like boiled chicken or peanut butter) immediately after releasing. The goal: Make the release the secondary reward, and the touch the primary one.
Step 2: Audio Familiarization (For Grinders)
If using an electric grinder, the high-pitched hum is often the primary stressor. Turn the grinder on in the next room while your dog eats. Gradually move it closer over several days. When they can eat calmly with the grinder running 1 meter away, they are ready for physical contact.
✅ Sign of Success: “Soft Eyes”
Look for relaxed facial muscles and a steady tail. If you see whites of the eyes (whale eye) or excessive panting, stop immediately. Ending the session while the dog is still under threshold prevents long-term trauma.
“A successful session isn’t measured by how many nails you cut, but by how much trust you built.”
Strategic Positioning: Control Without Constraint
Safety in dog nail care at home is built on “gentle control.” If you restrain a dog too tightly, you trigger their survival instinct to struggle. Instead, use positioning that leverages gravity and comfort to keep the paw steady.
Size-Specific Handling Protocols
- The “Table Method” (Small/Medium Dogs): Place your dog on a stable table covered with a towel. Stand to the side and drape your arm over their body. This provides a “weighted” sense of security without pinning them down.
- The “Side-Lying” Position (Large/Seniors): Have your dog lie on their side. This is the safest position for senior dogs with arthritis, as it doesn’t require them to balance on three legs during the dog nail care at home process.
- The “Reverse Hold” (Professional Secret): Instead of pulling the paw forward (which dogs hate), fold the leg back like a horse’s hoof. This allows you to look at the nail from the bottom-up, giving you the best view of the quick.
The “Three-Finger Grip” Technique
How you hold the individual toe is critical. Use your thumb and forefinger to stabilize the specific toe you are trimming, while your middle finger supports the paw pad. This prevents the nail from vibrating or twisting—a major source of discomfort during dog nail care at home.
The Master Technique: Trimming with Precision
Trimming is not a single “snip”; it is a series of strategic shaves. Rushing through dog nail care at home is the leading cause of accidental “nicking.”
1. The 45-Degree Rule
Always cut at a 45-degree angle, following the natural curve of the nail. Cutting straight across can crush the nail and leave sharp edges that snag on carpets.
2. Identifying the “Chalky Circle”
In your dog nail care at home routine, think like a sculptor. After each tiny shave (1-2mm), look at the cut surface:
- Step A: The initial cut looks white and chalky. This is the dead keratin shell.
- Step B: As you get closer, the center becomes gray or translucent.
- Step C: The “Stop” Sign—A small, dark, or moist-looking circle appears in the middle. This is the beginning of the Quick’s protective sheath. Stop here.
🍦 The “Jackpot” Reward System
Don’t just give a treat at the end. Give a “micro-treat” for every single nail. If your dog is particularly anxious, give a “Jackpot” (3-4 treats at once) after finishing a difficult paw. This creates a high-motivation environment for your next session.
Crisis Management: What to Do If Bleeding Occurs
Accidentally “nicking the quick” is a common occurrence in dog nail care at home, even for professionals. The most critical factor is your emotional reaction. If you remain calm, your dog will recover faster. If you panic, you validate their fear that the process is dangerous.
The Styptic Dip Protocol
If you see a drop of blood, don’t just wipe it. Follow these steps immediately:
- The Dip: Pour a small amount of styptic powder into the cap. Press the bleeding nail directly into the powder and hold it there for 30 seconds.
- Pressure: If powder alone doesn’t stop it, use a clean gauze and apply steady, firm pressure. Do not keep lifting the gauze to “check”—this breaks the forming clot.
- Post-Accident Jackpot: Give a handful of high-value treats immediately. You want the last memory of the session to be “tasty snacks,” not “sharp pinch.”
When to Consult a Veterinarian
While 99% of nicks stop bleeding within 5–10 minutes, seek professional help if the bleeding is pulsatile (spurting) or if it has not stopped after 20 minutes of continuous pressure. This may indicate a deeper laceration or an underlying clotting issue.
Adaptive Strategies for Special-Needs Dogs
1. The Senior Protocol: Prioritizing Orthopedic Comfort
Older dogs often suffer from Osteoarthritis. Forcing their legs into certain positions can be excruciating. In your dog nail care at home routine for seniors, remember:
- Low-Impact Positions: Let them stay lying down. Move your body to reach their paws rather than pulling their limbs toward you.
- Nail Brittleness: Senior nails are prone to splintering. Using a grinder (dremel) is often safer and more comfortable than clippers for aged dogs.
2. The Extreme Anxiety Alternative: Scratch Boards
If your dog suffers from severe “cliper-phobia,” don’t force it. You can build or buy a Scratch Board—essentially a board with sandpaper that the dog “digs” at to earn treats. This allows the dog to perform their own dog nail care at home through natural filing behavior.
Professional Reference: As noted by the American Kennel Club (AKC), if a dog displays signs of “learned helplessness” or extreme aggression, it is vital to consult a professional groomer or vet-tech. Safety must always include psychological safety.
Expert FAQ: Troubleshooting Dog Nail Care at Home
Q: How often should I realistically perform dog nail care at home?
Most active dogs need a trim every 3–4 weeks. However, if you are trying to “push back” a long quick, you should perform tiny “micro-trims” every 7–10 days. If you hear clicking on floors, you’ve waited too long.
Q: Is grinding truly better than clipping for beginners?
For beginners, grinding (Dremel) is often safer because it removes nail tissue in microns, giving you time to stop before hitting the quick. Clipping is faster but requires higher precision and “all-or-nothing” confidence.
Q: My dog’s nails are curling—can I fix this at home?
Extremely overgrown nails that curve toward the pad are a medical priority. Do not try to cut them to “normal” length in one day. Trim the very tip every week to encourage the quick to recede safely. If the nail has already pierced the pad, see a vet immediately.
The Master Checklist for Seamless Maintenance
🟢 Phase 1: Prep
- Identify the “Metabolic Window” (post-walk fatigue).
- Sterilize blades & test grinder battery.
- Set up the “Styptic Station” (powder & gauze).
🟠 Phase 2: Execution
- Use the “Three-Finger Grip” for stability.
- Apply the 45-degree angle rule.
- Watch for the “Dark Moist Dot” (The Quick).
Confidence Through Consistency
Mastering dog nail care at home is one of the greatest gifts you can give your dog. It’s a journey of patience that transforms a stressful chore into a bonding ritual. Start small, stay calm, and watch your dog’s mobility—and trust—thrive.
Protecting their paws today for a healthier run tomorrow.
Editorial Integrity & E-E-A-T Commitment
Content on PetCareCompass.com is architected under the direct supervision of our SEO Director and Content Manager, specialized in veterinary-aligned pet husbandry. Every article is developed using our proprietary Systemic Stewardship Implementation framework, ensuring all directives meet the highest standards of Experience, Expertise, Authoritativeness, and Trustworthiness (E-E-A-T) for the US search market. We prioritize clinical authority and structured data—including FAQ Schema Markup—to provide human-verified, high-integrity care protocols that neutralize biological decay and secure long-term domestic health for pets. Our mission is to transform general pet ownership into professional-grade stewardship through precision, transparency, and evidence-based care.
Veterinary-Aligned Care Protocols