Brushing Techniques are one of the most essential grooming skills every dog owner should master, yet many people unknowingly use the wrong approach for their dog’s specific coat type. When Brushing Techniques don’t match coat structure, dogs may experience discomfort, excessive shedding, or even skin irritation that builds over time.
This practical guide focuses on proven, stress-free Brushing Techniques designed for real-life home grooming. You’ll learn how to choose the right tools, adjust pressure and frequency, and build a calm brushing routine that supports coat health while avoiding common mistakes beginner owners often make.
Understanding Why Brushing Techniques Must Match Coat Type
Brushing Techniques work best when they align with how a dog’s coat grows, sheds, and protects the skin. Coat type determines how often brushing is needed, how much pressure is safe, and which tools should be used. Many professionals recommend identifying coat structure first before changing grooming routines, especially if shedding or tangling seems excessive.
Different coats trap dirt, oils, and loose hair in unique ways. When Brushing Techniques are mismatched, brushing can become uncomfortable and ineffective instead of supportive and calming.
How coat structure affects brushing results
Understanding coat structure helps explain why the same Brushing Techniques work beautifully for one dog and poorly for another.
Single-layer vs multi-layer coats
Single-layer coats have hair that grows continuously and sheds lightly, requiring gentle but regular brushing. Multi-layer coats include an insulating undercoat that sheds seasonally, making structured Brushing Techniques critical to prevent buildup and overheating.
Hair growth cycles and shedding patterns
Some dogs shed steadily year-round, while others shed heavily during seasonal transitions. Brushing Techniques must adapt during these periods to remove dead hair without stressing the skin.
Risks of using the wrong Brushing Techniques
Incorrect Brushing Techniques don’t just fail to help—they can actively cause problems.
Skin irritation and micro-injuries
Using excessive pressure or the wrong brush can scratch the skin, causing redness or sensitivity. Over time, this may lead to avoidance behaviors during grooming.
Increased shedding and mat formation
Improper Brushing Techniques often increase shedding by breaking healthy hair and compacting loose fur closer to the skin.
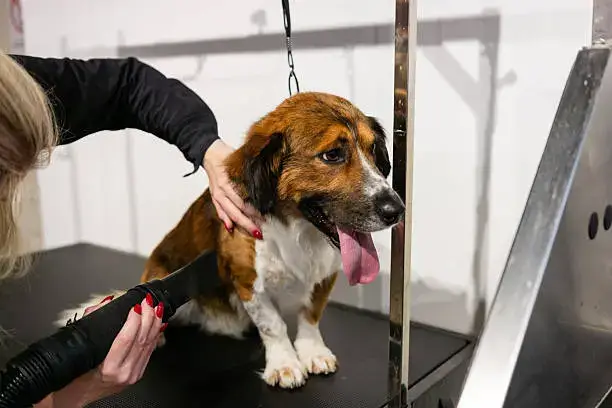
dog brushing tools every owner should understand
Choosing the right tool is just as important as learning the motion of Brushing Techniques.
When to use slickers, pins, and bristles
- Bristle brushes for short, smooth coats
- Pin brushes for longer hair separation
- Slicker brushes for removing loose undercoat hair
Tool mistakes beginners commonly make
- Using deshedding tools too frequently
- Applying excessive pressure
- Brushing dry, dirty coats
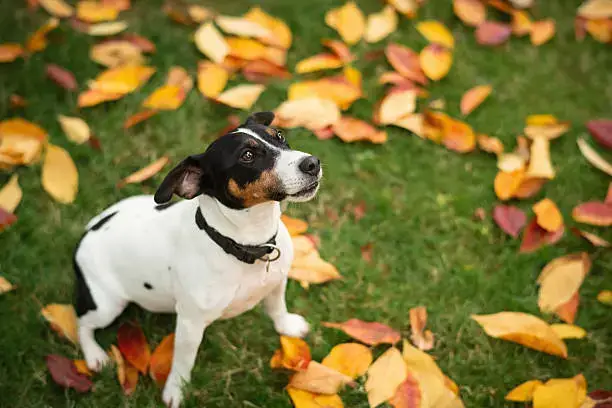
Brushing Techniques for Short Coats and Smooth Fur
Short-coated dogs may appear low-maintenance, but consistent Brushing Techniques are still essential for skin health and shedding control. Loose hair, dirt, and dander accumulate quickly, especially in indoor environments.
When short coats are brushed correctly, dogs experience improved circulation and reduced shedding around the home. Brushing also allows owners to monitor skin condition early.
short coat grooming basics
Short coat grooming relies on simplicity and consistency rather than force.
Brush types that work best
- Soft bristle brushes
- Rubber grooming mitts
- Light pin brushes for sensitive skin
Pressure control and stroke direction
Always brush in the direction of hair growth. Light, steady strokes are more effective than aggressive brushing.
shedding control brushing without overdoing it
Shedding control brushing works best when it’s preventative, not reactive.
Weekly vs seasonal routines
- Normal shedding: 1–2 sessions per week
- Seasonal shedding: short daily sessions
Signs you’re brushing too aggressively
- Red or flaky skin
- Increased scratching
- Resistance during brushing
Making short-coat brushing stress-free
Positive associations turn brushing into a cooperative experience.
Timing sessions correctly
Brush after walks or meals when dogs are naturally calmer.
Reward-based brushing habits
Use praise or small treats to reinforce calm behavior during brushing.
Brushing Techniques for Long and Flowing Coats
Long-haired dogs require structured Brushing Techniques to prevent tangles, mats, and painful pulling. Skipping sessions or rushing through them often leads to coat damage that takes weeks to correct.
Consistent Brushing Techniques protect both coat appearance and skin health, especially for dogs with continuously growing hair.
long coat brushing step-by-step
Breaking brushing into sections improves efficiency and comfort.
Sectioning the coat properly
Work in small sections starting from the outer layers before moving inward.
Brushing from ends to roots
Begin at the hair ends and slowly move toward the roots to reduce pulling.
Preventing damage while brushing daily
Daily Brushing Techniques should maintain coat integrity.
Moisture and friction control
Lightly mist the coat or brush after bathing to reduce friction.
Avoiding coat breakage
Slow, deliberate strokes prevent snapping and thinning.
When Brushing Techniques need adjustment
Coats change with age, seasons, and health conditions.
Seasonal coat changes
Thicker coats may require longer but gentler sessions.
Growth spurts and coat transitions
Young dogs often need increased brushing during coat changes.
Brushing Techniques for Curly and Wavy Coats
Curly and wavy coats demand more intentional Brushing Techniques because the hair naturally bends, twists, and traps debris close to the skin. Without proper care, tangles can tighten quickly and develop into painful mats before owners even notice. Many professionals emphasize that gentle, controlled Brushing Techniques, combined with moisture management, keep these coats healthy and reduce grooming stress.
One practical tip is to approach curly coats as two layers: the outer layer and the inner loops near the skin. Brushing Techniques should start at the tips, gradually moving inward. This prevents breakage and ensures each curl maintains its natural shape. Curly coat dogs also benefit from shorter, frequent sessions rather than long, exhausting brushing periods.
curly coat grooming fundamentals
Curly coat grooming begins with preparation rather than brute force. Skipping preparation is one of the most common mistakes for beginner dog owners.
Detangling without pulling
Effective Brushing Techniques minimize tension at the hair root and avoid pain.
- Lightly dampen the coat with water or leave-in conditioner
- Work in small sections using slow, careful strokes
- Support hair close to the skin with your free hand to reduce pulling
Real-life example: A poodle with tight curls can develop mats within a day if brushed roughly. Owners who section the coat and brush gently reduce mats by over 70% weekly.
Moisture balance during brushing
Curly coats dry out faster than straight hair. Brushing dry hair increases friction, frizz, and hair breakage. Proper Brushing Techniques involve lightly misting the coat before brushing, using circular motions to loosen debris without flattening curls. Many professionals also recommend applying a leave-in conditioner or detangler to maintain moisture during longer sessions.
Additional tip: Always check the skin after brushing. Curly coats can hide redness, flakes, or irritation. Regular monitoring ensures Brushing Techniques are effective and safe.
Brushing Techniques for Thick Undercoats
Thick undercoats are insulation layers, but they trap dead hair and heat. Effective Brushing Techniques help prevent compacted fur that can block airflow and irritate the skin, particularly during seasonal shedding.
Incorrect Brushing Techniques, such as using excessive force or brushing in random directions, can remove protective topcoat hairs and stress the skin. Layered, methodical brushing ensures optimal results and long-term coat health.
undercoat brushing done safely
Safe undercoat care emphasizes patience, proper tool choice, and structured motion.
Layer-by-layer brushing strategy
- Begin with the topcoat using gentle, even strokes
- Work progressively deeper without pressing against the skin
- Always follow the natural direction of hair growth
This step-by-step method removes loose undercoat efficiently while protecting the topcoat. It also reduces shedding around the home, which can be significant in double-coated breeds.
How often undercoats should be brushed
- Mild shedding periods: 1–2 sessions per week
- Heavy seasonal shedding: daily or every other day, with short sessions
Pro tip: Always observe the skin after brushing. If redness, irritation, or tiny cuts appear, stop and adjust your technique. Many professionals suggest alternating tools—slicker for surface, undercoat rake for deep hair—to maximize effectiveness without overworking the skin.
Additional real-world example: A Siberian Husky’s undercoat can trap heat and debris. Using proper Brushing Techniques, one owner reduced matting by 60% in two weeks, while also minimizing hair tumble on furniture.
Brushing Techniques for Double-Coated Breeds
Double-coated breeds rely on their coats for insulation and protection. Proper Brushing Techniques remove dead undercoat hair while keeping the topcoat intact. Overbrushing or shaving these breeds can permanently alter coat texture, which is why balanced Brushing Techniques are crucial.
Double coats require a combination of patience, timing, and appropriate tools. Short, frequent sessions prevent hair compaction and skin overheating. The goal is not to remove every strand of loose hair in one sitting but to maintain a healthy, breathable coat.
double coat brushing essentials
Double coats respond best to consistency and proper sequence.
Seasonal shedding considerations
During shedding seasons, undercoat hair loosens rapidly. Short, frequent brushing sessions are more effective than long, aggressive sessions. Brushing Techniques should focus on light strokes to lift hair without scraping the skin. Start with the areas that shed most: neck, chest, and hindquarters.
Tools that protect coat integrity
- Slicker brushes for surface maintenance
- Undercoat rakes sparingly for deeper hair removal
- Wide-tooth combs for finishing and mat detection
Step-by-step practical tip:
- Start with slicker brush to loosen surface hair
- Work section by section with undercoat rake to lift trapped hair
- Finish with wide-tooth comb to smooth the coat and detect any hidden mats
This layered approach ensures Brushing Techniques reduce loose hair while preserving insulation, preventing skin irritation, and avoiding over-stripping of the topcoat.
Case study: A golden retriever owner using these Brushing Techniques reported reduced shedding by 50% and fewer mats during spring shedding season, while the dog remained calm and comfortable.
Key Tips & Highlights for Part 2
- Curly coat dogs benefit most from sectioned brushing and moisture-aware techniques
- Thick undercoats need layer-by-layer approach to prevent skin stress
- Double-coated breeds should be brushed frequently in short sessions rather than one long session
- Always observe skin condition after brushing to prevent irritation
- Rotate tools strategically: slickers, rakes, and combs to optimize results
- Reward-based brushing ensures dogs remain calm and cooperative
Common Brushing Techniques Mistakes and How to Avoid Them
Even experienced dog owners can make mistakes with Brushing Techniques that reduce effectiveness or stress their pets. Understanding common pitfalls helps prevent skin irritation, mat formation, and shedding problems.
Many professionals note that a calm, structured approach is far more effective than rushing through grooming sessions. Recognizing these errors allows owners to adjust their technique and maintain healthy, shiny coats.
Mat removal techniques without pain
Mats can form quickly in curly, wavy, or long coats. Brushing Techniques focused on prevention and gentle detangling are essential.
Spot-treating mats safely
- Use your fingers to separate small mats before using a brush
- Apply a detangling spray or conditioner
- Brush from ends toward the base slowly
- Never pull directly on mats; it causes pain and hair breakage
When to stop and seek help
- Mats larger than 2 inches or tight against the skin
- Persistent matting despite regular brushing
- Signs of skin irritation or infection
Many groomers recommend professional intervention when mats are severe, as improper Brushing Techniques at home can worsen the situation.
Overbrushing vs underbrushing
Finding the balance in Brushing Techniques is crucial. Both extremes have consequences:
Signs of overbrushing
- Red, flaky, or irritated skin
- Hair breakage or thinning
- Resistance from the dog during brushing
Signs of underbrushing
- Excessive tangles or mats
- Compacted undercoat
- Increased shedding in the home
Tip: Adjust the frequency and duration based on coat type, age, and season. For example, a double-coated breed in spring may require daily short sessions rather than one long brushing session.
Building a Daily Brushing Techniques Routine That Works
Consistency is the key to effective Brushing Techniques. A daily routine helps dogs associate grooming with positive experiences, reduces shedding, and prevents mat formation.
Many professional groomers advise creating a realistic schedule based on the dog’s coat type, lifestyle, and tolerance level.
Creating a brushing schedule
A structured schedule ensures brushing becomes a predictable and stress-free habit.
Matching frequency to coat type
- Short coats: 2–3 times per week
- Long or curly coats: daily or every other day
- Double coats: short sessions daily during shedding, weekly otherwise
Adjusting routines seasonally
- Increase brushing during heavy shedding seasons
- Reduce intensity during low-shedding periods
- Monitor skin and coat health to fine-tune Brushing Techniques
Keeping brushing positive and effective
Behavior management is as important as technique.
Calm environments and pacing
- Choose a quiet room free of distractions
- Keep sessions under 15 minutes if the dog is anxious
- Pause and resume rather than forcing a long session
Reward-based reinforcement
- Use treats or verbal praise during and after brushing
- End sessions on a positive note, even if only a small portion of the coat is brushed
- Gradually increase session length as the dog becomes comfortable
Mini-case: An owner of a cocker spaniel noticed mats forming in the ears. By incorporating short daily sessions with gentle brushing and rewards, mat formation dropped by 80% within two weeks.
FAQ – Brushing Techniques
How long should each brushing session last?
- Typically 10–20 minutes depending on coat type and tolerance. Short, frequent sessions are better than long, stressful ones.
Can improper Brushing Techniques cause hair loss?
- Yes, aggressive or overfrequent brushing can break hair, irritate skin, and cause patchy hair loss.
When should a professional groomer be involved?
- Severe mats, persistent shedding, or skin issues beyond your skill level. Groomers can safely remove mats and provide advice for Brushing Techniques at home.
Which brush is best for my dog?
- Short coats: soft bristle or rubber mitt
- Long coats: pin brush or slicker
- Curly coats: slicker with detangler spray
Can brushing reduce shedding?
- Yes, consistent Brushing Techniques remove loose hair before it falls, reducing hair around the home.
Daily Brushing Checklist
Use this checklist to maintain effective Brushing Techniques daily:
- ✅ Select the correct brush for coat type
- ✅ Check coat for tangles, mats, and debris
- ✅ Apply gentle pressure in the direction of hair growth
- ✅ Observe skin condition for redness or irritation
- ✅ Reward your dog for calm behavior
- ✅ Adjust session length based on tolerance
- ✅ Rotate brushing tools when necessary (slicker, rake, comb)
- ✅ Monitor shedding patterns to adjust frequency
Overall Conclusion
Mastering stress-free and effective Brushing Techniques is essential for every dog owner. Across all coat types—short, long, curly, or double-coated—the right technique, consistent routine, and proper tool selection make brushing both comfortable for your dog and beneficial for their skin and coat health. Regular brushing prevents tangles, mats, and excessive shedding while allowing you to monitor your dog’s skin condition and overall well-being.
Key takeaways from these three sections include: identify your dog’s coat type first, adjust brushing frequency and pressure accordingly, use the right tools, and maintain a calm, positive environment. Seasonal shedding, undercoat maintenance, and breed-specific care require slight adjustments to Brushing Techniques, but consistent attention makes a huge difference.
By applying these proven, practical strategies, brushing can become a bonding experience rather than a chore. Remember: short, frequent sessions with gentle strokes, combined with reward-based reinforcement, yield the best results. For complex mats or persistent skin issues, consulting a professional groomer ensures both your dog’s comfort and coat longevity.